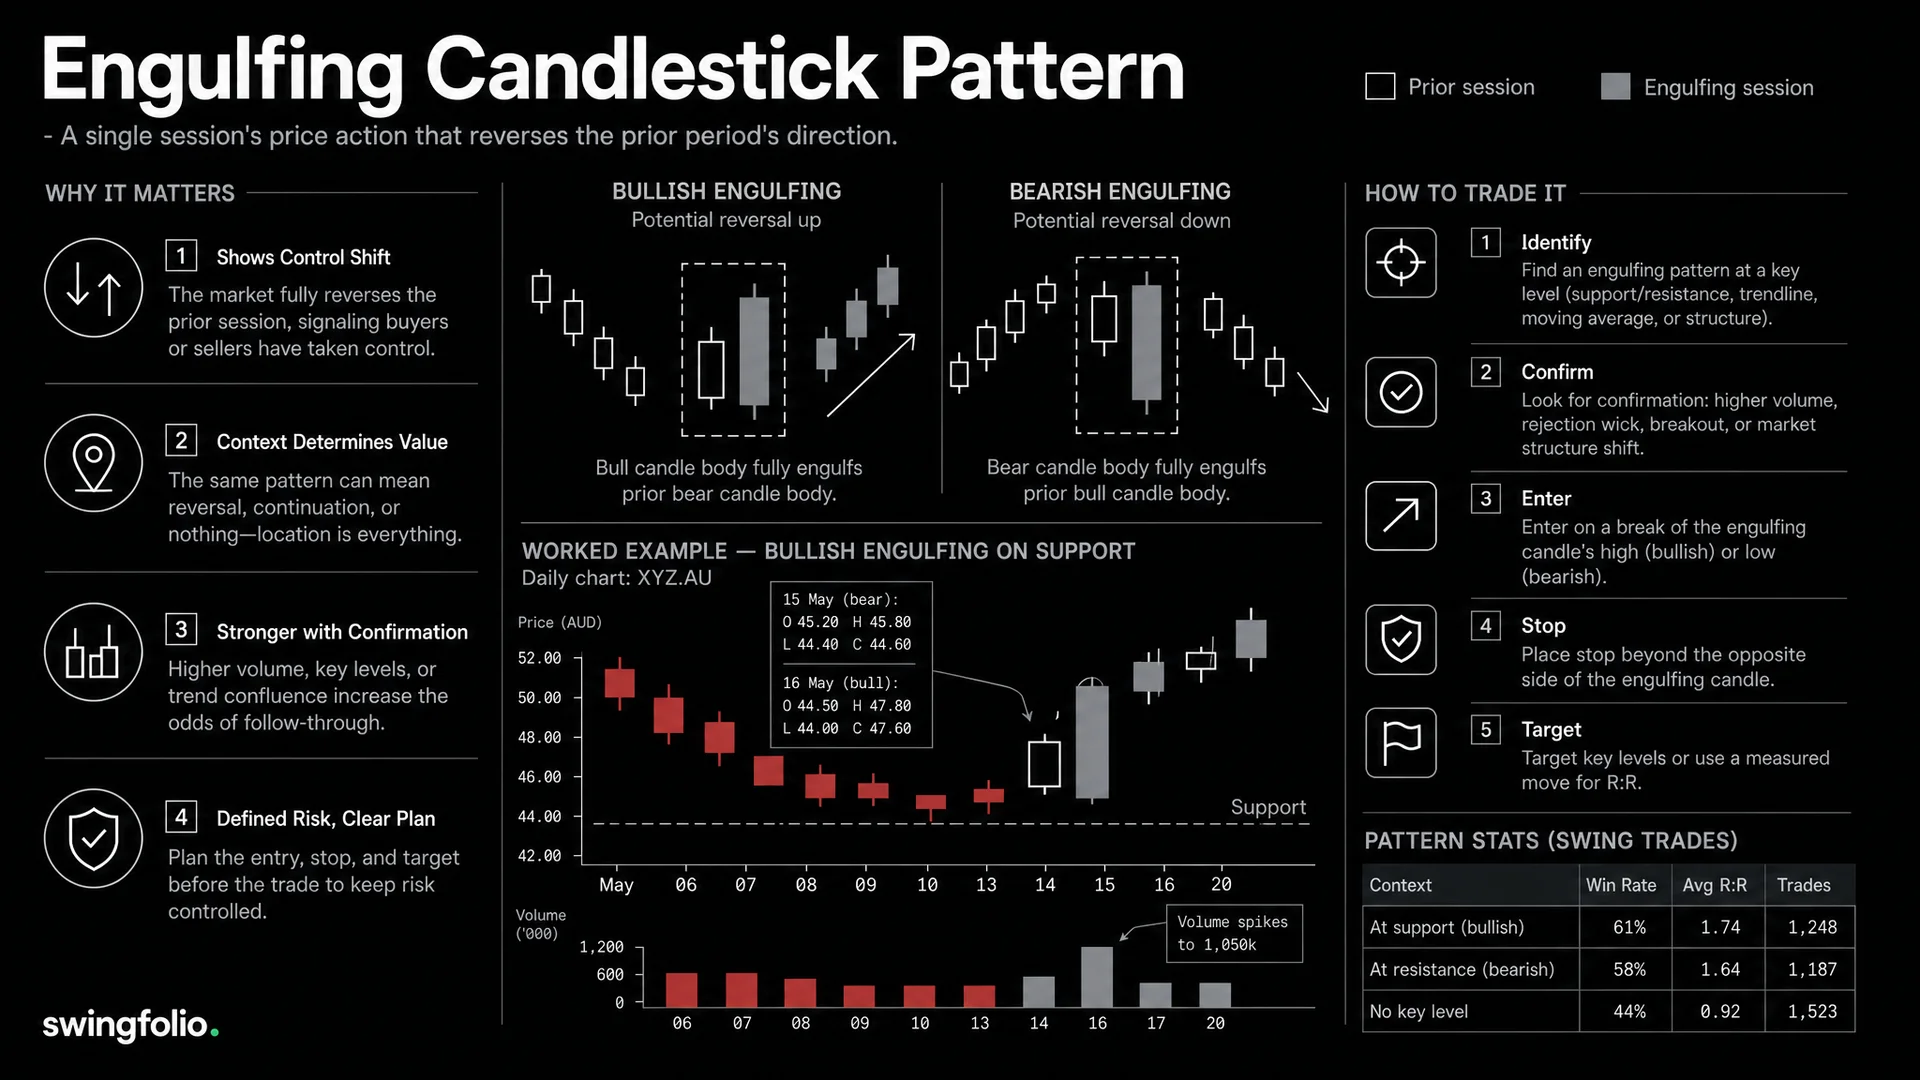
An engulfing candlestick pattern has two candles. The second candle's real body covers the first candle's entire real body. The real body is the distance between the open and close. The wicks do not need to be engulfed.
For swing trading, the shape is only the starting point. A bullish engulfing candle after a pullback into support carries different information from the same shape in the middle of a range.
Bullish and bearish engulfing definitions
Bullish engulfing candle
A bullish engulfing pattern usually follows a downswing or pullback:
- The first candle closes below its open.
- The second candle opens at or below the first close.
- The second candle closes at or above the first open.
Bearish engulfing candle
A bearish engulfing pattern usually follows an upswing:
- The first candle closes above its open.
- The second candle opens at or above the first close.
- The second candle closes at or below the first open.
Charting platforms can use slightly different rules for equal opens and closes. State the rule you test and apply it consistently.
Body engulfing versus whole-range engulfing
The standard body definition ignores the wicks. A stricter whole-range rule requires the second candle's high to exceed the first high and its low to fall below the first low.
Do not mix the two definitions in your records. A whole-range engulf is a different, rarer condition. Label it separately if you want to test whether it changes results.
What the candle shows
In a bullish engulfing pattern, sellers controlled the first session. During the second session, buyers pushed the close through the full prior body. The bearish pattern reverses those roles.
That is evidence of a one-session change in pressure. It does not show that a new trend must follow. The next support, resistance, market trend and trading costs still determine whether the setup offers a usable trade.
Context that makes the pattern useful
Check these conditions before planning an entry:
- Prior move: A reversal pattern needs a move to reverse. Identify the downswing before a bullish pattern or the upswing before a bearish one.
- Location: Mark prior swing levels, support, resistance and relevant moving averages.
- Close quality: A bullish candle closing near its high shows less late selling than one with a long upper wick. Reverse the logic for a bearish candle.
- Volume: Compare the second candle's volume with recent sessions. Higher activity can support the move, but follow-through still depends on later buying and selling.
- Momentum: RSI can show whether a move has become stretched. Use it as context rather than confirmation on its own; the RSI oversold bounce guide explains that distinction.
- Market and sector: A long setup has a different risk when its index and sector are both falling.
- Space to target: Check whether nearby resistance or support leaves enough potential reward after costs.
An engulfing candle can also time continuation. A bullish pattern on a pullback to support within a larger uptrend is a possible re-entry trigger rather than a bet on a full trend reversal.
For other shapes, see candlestick patterns for traders. Multi-day structures such as flags and triangles appear in the chart patterns guide.
Scenario 1: bullish engulfing at support
This scenario uses fictional security ALP.AU and hypothetical prices.
ALP.AU pulls back for five sessions toward prior support near $40.00. The first candle opens at $40.40 and closes at $39.90. The next session opens at $39.80, trades as low as $39.20 and closes at $40.60. Its body engulfs the first body.
- Trigger: Enter only if price trades above the engulfing high at $40.70. Assume a fill at $40.75.
- Stop: $39.15, below the engulfing low and support test.
- Risk per share: $40.75 - $39.15 = $1.60.
- Target: Prior resistance at $43.95.
- Gross reward: $43.95 - $40.75 = $3.20, or 2R.
For a $40,000 account risking a hypothetical 0.5%, the risk budget is $200. The raw size is $200 / $1.60 = 125 shares.
Assume $20 estimated round-trip costs. If costs must fit inside the $200 budget, market risk has $180 left. Round down to 112 shares. A gap below $39.15 can still create a loss larger than planned.
The trigger avoids entering solely because the candle exists. If ALP.AU never trades above $40.70, the trade is not opened.
Scenario 2: bearish engulfing at resistance
This scenario uses fictional security BRV.AU and hypothetical prices.
BRV.AU rallies into prior resistance near $76.00. The first candle opens at $74.80 and closes at $75.60. The next session opens at $75.80, reaches $76.20 and closes at $74.50. The second body engulfs the first.
- Trigger: Enter short only below the engulfing low at $74.40. Assume a fill at $74.35.
- Stop: $76.25, above the pattern high.
- Risk per share: $76.25 - $74.35 = $1.90.
- Target: Prior support at $70.55.
- Gross reward: $74.35 - $70.55 = $3.80, or 2R.
With a $50,000 account and a hypothetical 0.5% risk budget, planned risk is $250. Before costs, the raw size is $250 / $1.90 = 131 shares, rounded down.
Short selling adds borrowing availability, borrowing fees and gap risk. A long-only trader can still use the bearish pattern as a prompt to review an existing position, tighten a rule-based stop or take a planned exit. It is not an automatic sell instruction.
Entry choices and confirmation
Three common entry rules have different trade-offs:
- Enter near the engulfing close. This gives an earlier price but no next-session confirmation.
- Enter when price breaks the pattern high for a bullish setup or low for a bearish setup.
- Wait for the next candle to close beyond the pattern. This adds confirmation but can reduce the remaining reward.
Choose one rule before reviewing results. Switching rules after seeing the next candle makes the test unreliable.
Stops, targets and position size
The opposite end of the pattern is a common invalidation point. A nearby swing level may provide a better technical boundary, but a wider stop reduces the unit count.
Use the position size calculator after setting the stop. Then compare the target with initial risk using the R-multiple guide. Include brokerage, slippage and borrowing costs when relevant.
The stop-loss guide and entry and exit guide cover the wider trade plan.
Common engulfing pattern mistakes
- Counting a whole-range rule in one trade and a body-only rule in another.
- Trading a pattern in the middle of a range without a level or prior move.
- Entering before defining the trigger and invalidation price.
- Ignoring a long wick against the proposed direction.
- Treating above-average volume as proof that price will continue.
- Using a fixed share count when the stop distance has changed.
- Reviewing only winners and never recording failed patterns.
How reliable is an engulfing pattern?
Thomas Bulkowski's bullish engulfing research reports that the pattern acted as a bullish reversal 63% of the time across hundreds of ideal historical trades. His reversal classification means price closed above the top of the candlestick pattern. It is not a 63% win rate for the entry, stop and 2R target used in this guide.
There is no dependable universal trading win rate. Results change with the exact definition, market, timeframe, entry rule, stop, target, costs and test period. A study that counts a directional reversal does not establish that a particular trade plan was profitable.
Test one written definition on the market and timeframe you trade. Record every qualifying setup, including those you skip, so discretion does not select only the clean examples.
Use Swingfolio's stock screener guide to narrow the market before checking chart context. Record the pattern, trigger, stop and result in the same journal entry. That gives you evidence about your version of the pattern rather than a borrowed headline rate.
Frequently asked questions
Do the wicks need to be engulfed?
No. The standard definition only requires the second candle's real body, from open to close, to cover the first candle's body. A whole-range engulf that also covers both wicks is a stricter pattern.
Is a bullish engulfing candle a buy signal on its own?
No. Treat it as a possible trigger after checking the prior move, support, volume, market context, stop and available reward.
What timeframe works for an engulfing pattern in swing trading?
Daily candles fit the multi-day holding period used in these examples. You can test another timeframe, but keep the definition, entry and exit rules consistent.
Where do you put the stop on an engulfing trade?
A common invalidation point is below the pattern low for a bullish setup or above the pattern high for a bearish setup. A nearby swing level may justify a different stop, which changes the position size.
How reliable is the engulfing pattern?
Bulkowski classified the bullish pattern as a directional reversal 63% of the time across hundreds of ideal historical trades. As explained above, that is not a win rate for the trigger, stop and 2R target in this guide.
Start the 30-day trial to review your engulfing setups and outcomes in Swingfolio.
General information only. Not financial advice.